null

Your Mini Cart

Freezer Meals to Make Before Baby Arrives

Freezer Meals to Make Before Baby Arrives

Preparing for a new baby, whether it is your first or not, is always an exciting time preparing for the new addition to the family.

On top of the usual things like washing the baby clothes, setting up the baby room and ticking off your newborn essentials checklist that you’ll need for when you bring your new family member home – another thing you should add to your list is ‘meals for the freezer’.

Trust us, one of the most helpful things you can do before your baby arrives, is to make sure you have a freezer full of meals prepared. Never underestimate how helpful this will be when it comes to juggling a newborn during witching hour while trying to get yourself (and other kids if you have them) fed!

This blog post is full of ideas to get those freezers full before baby arrives. And…if you have friends who want to help when baby arrives, send them this list….and tell them to start cookin’! They will be happy to help and love that you’ve asked and told them how they can.

We've included a few recipes (thanks to Laura from The Kiwi Country Girl) and have also included some other links to useful website. But hopefully this blog post will give you some ideas and inspiration to cook your favourite recipes for these meals, which other parents have suggested are great when there is a newborn in the house!

Most popular freezer meals to prepare before baby arrives

We’ve done quite a few polls and Q&A’s with our communities online around freezer meals, and these ideas are a combination of our fans go-to-freezer-meals as well as ideas from our teams own personal experiences.

Lasagne

It isn’t a surprise to us that this has been one of the top suggestions. Easy to included and/or ‘hide’ veges and cut up into multiple portions for the freezer. Expand for Lasagne recipe from Laura from ‘The Kiwi Country Girl’ who has shared this with us.

Laura's Easy Lasagne Recipe

Ingredients

Meat sauce

  • 2 TBSP oil
  • 1 onion
  • 2 cloves garlic
  • 1 kg (2.2lb) mince/ground beef
  • 2 x 400g tins chopped tomatoes
  • 2 cups beef stock
  • ¼ cup tomato paste
  • 2 TBSP chopped fresh herbs e.g. rosemary, oregano, parsley or 1 TBSP dried mixed herbs
  • 1 bay leaf
  • 1 TBSP balsamic vinegar
  • 1 TBSP brown sugar
  • ¼ tsp salt
  • ¼ tsp pepper

Cheese sauce

  • 80g butter
  • ½cup (70g) flour
  • 4cups milk
  • 1cup grated cheese
  • 2tsp dijon mustard
  • ¼tsp nutmeg
  • Salt & pepper

To assemble

  • 400g dried or fresh lasagne sheets
  • ½cup grated cheese


Instructions

Meat sauce

  1. Finely chop the onion and crush the garlic.
  2. Heat oil in a large frying pan over a medium heat, add the onion & garlic and cook for 2 minutes until fragrant.
  3. Add the mince and cook until brown (10-15 minutes).
  4. Add the remaining meat sauce ingredients and combine. Reduce the heat to low/medium and simmer for around 40 minutes until the sauce has thickened and almost all liquid has evaporated.
  5. Remove the bay leaf and discard.

Cheese sauce

  1. While the meat sauce is cooking, make the cheese sauce. In a microwave proof jug or in a small pot on the stove, heat the milk for about 1 minute, until warm. Set aside. (This step is optional but speeds up the cheese sauce process)
  2. In a medium sized pot add the butter and flour and cook over a medium heat until the butter has melted. Cook for a couple of minutes, being careful not to let it burn. It will almost puff up which is what you want.
  3. Add about ½ cup of the milk and whisk it into the flour mixture until there are no lumps. Add the rest of the milk and bring to boil, whisking every 20 seconds or so to make sure it doesn't stick to the bottom and go lumpy.
  4. Once the sauce thickens (5-8 minutes) take it off the heat and whisk in the grated cheese, mustard, nutmeg and salt & pepper.

To assemble

  1. Preheat the oven to 180°C/350°F.
  2. In a large baking dish (mine is 30cm x 20cm and 6cm deep) assemble the layers of the lasagne. Spread ⅓ of the meat sauce on the bottom of the dish, followed by ⅓ of the pasta sheets (break them up to fit the shape of the dish) and ⅓ of the cheese sauce. Repeat until you have 3 layers of each, ending with the last of the cheese sauce.
  3. Sprinkle the remaining grated cheese on top. If you are going to freeze the lasagne see Note 1.
  4. Bake for 30-40 minutes until the cheese is golden brown. You may want to grill it at the end for a few minutes to get it nice and golden.
  5. Remove from the oven and allow to cool for 10-15 minutes before serving.
  6. Any leftovers can be frozen and reheated according to the directions in Note 1.

Notes

Note 1. If you are making the lasagne in a freezable dish (e.g. foil) once you have finished assembling it, you can cover it and freeze. To cook, defrost the lasagne completely and then bake as per instructions but for 40-50 minutes to ensure it is heated all the way through.

You can view Laura's website here for her step-to-step guide with pictures her The Kiwi Country Girl website

Mac & Cheese

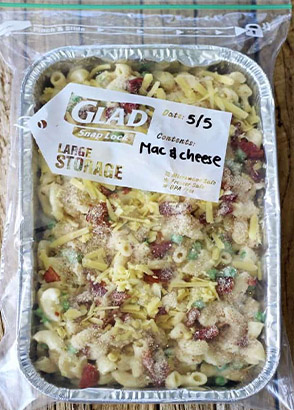
Another meal that got lots of votes was Mac & Cheese. Yum, filling, easy to reheat and one that toddlers will like too! Laura has shared her delicious recipie for this family favourite, which is great for freezing!

Easy Baked Mac & Cheese Recipe

Ingredients

  • 250g dried macaroni
  • 50g butter
  • ¼cup flour
  • 2cups milk
  • 1 ½cups grated cheese (I used a mixture of tasty & parmesan)
  • Salt & pepper
  • ¼tsp nutmeg (optional)
  • 1tsp wholegrain mustard
  • Toppings
  • ½cup breadcrumbs
  • ½cup grated cheese
  • ½cup crispy bacon bits

Instructions

  1. Bring a large pot of water to the boil and add the dried macaroni. Cook according to package directions, drain and set aside.
  2. In a microwave proof jug, heat 2 cups of milk for about 1 minute, until warm. Set aside. (This step is optional but speeds up the cheese sauce process)
  3. In a medium sized pot add the butter and flour and cook over a medium heat until the butter has melted, whisking constantly. Cook for a couple of minutes, being careful not to let it burn.
  4. Add about ½ cup of the milk and whisk it into the flour mixture until there are no lumps. Add the rest of the milk and bring to boil, whisking all the time to make sure it doesn't stick to the bottom and go lumpy.
  5. Once the sauce thickens (5-8 minutes) take it off the heat and whisk in the grated cheese, nutmeg (if using), wholegrain mustard and salt & pepper.
  6. Add the cooked macaroni to the cheese sauce and stir through. At this point you can add anything else you want to add to - maybe peas, broccoli, chorizo etc.
  7. Pour into an oven dish, top with the remaining grated cheese, bacon bits, and breadcrumbs. If you are planning on freezing the mac and cheese, at this point cover the dish with gladwrap or put in a snaplock bag and freeze. When you are ready to eat it, remove it from the freezer a few hours before you are ready for it and continue as below.
  8. If you are eating it immediately, bake at 180°C for 15 minutes or grill at 200°C for 5-10 minutes until the cheese is golden brown.
  9. Serve immediately


View this recipie on Laura's website

Bacon & Egg Breakfast Muffins

Lots of time we think about preparing dinners. But what about breakfast or lunch? Bacon and Egg Breakfast muffins are quick and easy to make and freeze really well. Perfect for an easy hand held meal when you need it!

Laura's Bacon ad Egg Breakfast Muffins

Ingredients

  • 8English muffins
  • 8eggs
  • 2Tablespoons milk
  • Salt & pepper
  • 4large rashers of bacon
  • 8cheese slices
  • Mayonnaise

Instructions

  1. Heat the oven to 180°C/350°F
  2. Whisk together the eggs, milk and salt & pepper. Pour into an oven proof dish, around 30cm x 20cm in size and bake for 12 minutes or until the eggs have set. Allow to cool before slicing into 8 pieces.
  3. Place rashers of bacon on a baking tray lined with a silicone liner or baking paper and bake for 10-12 minutes until cooked to your liking. Allow to cool and slice the rashers in half.
  4. Turn up the oven to 200°C/392°F on the grill setting. Cut the muffins in half and place on a baking tray and grill for 10 minutes until golden brown. You may also use the toaster for this step. Remove from the oven and allow to cool before assembling the muffins.

To assemble the muffins

  1. Spread mayonnaise on the bottom half of the muffins then add a slice of egg, a slice of cheese, bacon and finish with the top half of the muffin.
  2. Wrap in tinfoil and freeze for up to 3 months.

To re heat the muffins

  1. Take the muffin out of the freezer, leave it wrapped in tinfoil and put it in the oven at 200°C or in the sandwich press until heated through - around 30 minutes
  2. Unwrap the muffin and microwave it until it is heated through - around 5 minutes
  3. Remove the muffins from the freezer the night before and allow to thaw in the fridge, then heat in the sandwich press or oven at 200°C for 10 minutes or until heated through.

For more information and step to step guide check out Laura's website for this recipie

Pasta Bake with veges

Cottage pie

Chicken Thighs

Pasta Sauce

Meatballs

Spaghetti bolognaise mix

Vegetable/tomato/pumpkin soup

Stew

Savoury Muffins

Mini Muffin Tin Quiches

Curried Sausages

Pies

Nacho mince - just add corn chips

Slow cooker freezer bags that can go straight in the slow cooker in the morning

Chicken Soup

Enchiladas

Chilli

Curries


Something sweet

Having a few sweet treats or some cookie dough in the freezer is perfect for when you need that little pick me up.

Oatmeal Chocolate Lactation Cookies

For something sweet, why not make some delicious lactation cookies which are perfect for a new Mama. You can freeze the dough from this recipe and pull it out when you need a sweet treat. Here is Laura's recipe for freezer friendly Lactation Cookie dough.

Oatmeal Chocolate Lactation Cookies

Ingredients

  • 115 g butter softened
  • ½ cup (100g) brown sugar
  • ½ cup (105g) white sugar
  • 1 egg
  • 1 tsp vanilla extract
  • ¾ cup (105g) flour
  • 1 ½ cup rolled oats
  • ¼ cup brewers yeast
  • 2 TBSP LSA or flaxseed/linseed
  • ½ tsp baking soda
  • ¼ tsp salt
  • 150 g dark chocolate chunks

Instructions

  1. Pre-heat the oven to 180°C/350°F and line a baking tray with baking paper or a Silpat liner.
  2. Cream butter and sugars using a stand or handheld mixer on high speed until creamy. Add egg and vanilla and beat on medium speed until combined.
  3. Add all remaining ingredients except the chocolate and mix on low speed until combined. Stir through the chocolate chunks.
  4. Using your hands, roll balls about 1 TBSP in size and place on the prepared tray. No need to flatten the cookies. At this stage you can also freeze the cookie dough (see note 1)
  5. Bake for 12 minutes, until just starting to go golden brown.
  6. Remove from the oven and allow to cool on the tray for 15 minutes before transferring to a cooling rack.
  7. Store in an airtight container at room temperature for 1 week.

Notes

  1. To freeze the cookie dough balls, place the rolled balls in a single layer on a baking sheet lined with baking paper (or anything else that can go in the freezer). Freeze for a couple of hours, or until firm and then transfer to a snaplock bag and store in the freezer for 3 months. When you are ready to bake them, remove from the freezer and place directly on the tray you will bake them on, allow the dough balls to come to room temperature and bake according to instructions.

Visit Laura's website for more information on this recipie and more pictures

Muffins with Oats in them

Smoothie packs

Sweet Muffins

Slices

Cakes

Pikelets